

With SnapEdit, you can remove objects from photos in four steps: upload the image, let AI detect what's in the frame, choose what to erase, then pick a removal model and tap Erase.
This guide walks through the exact workflow, including when to switch models for tricky photos, and when manual brushing works better than AI auto-detect.
How SnapEdit's Object Removal Actually Works
SnapEdit's remove object tool runs on AI object detection paired with inpainting. Detection finds every person and object in the photo and draws a mask around each one. Inpainting then fills the empty space left behind with new pixels that match the surrounding background.
The tool offers three inpainting models under the hood, each suited to a different kind of photo. Step 4 explains what each one is for and how to choose.
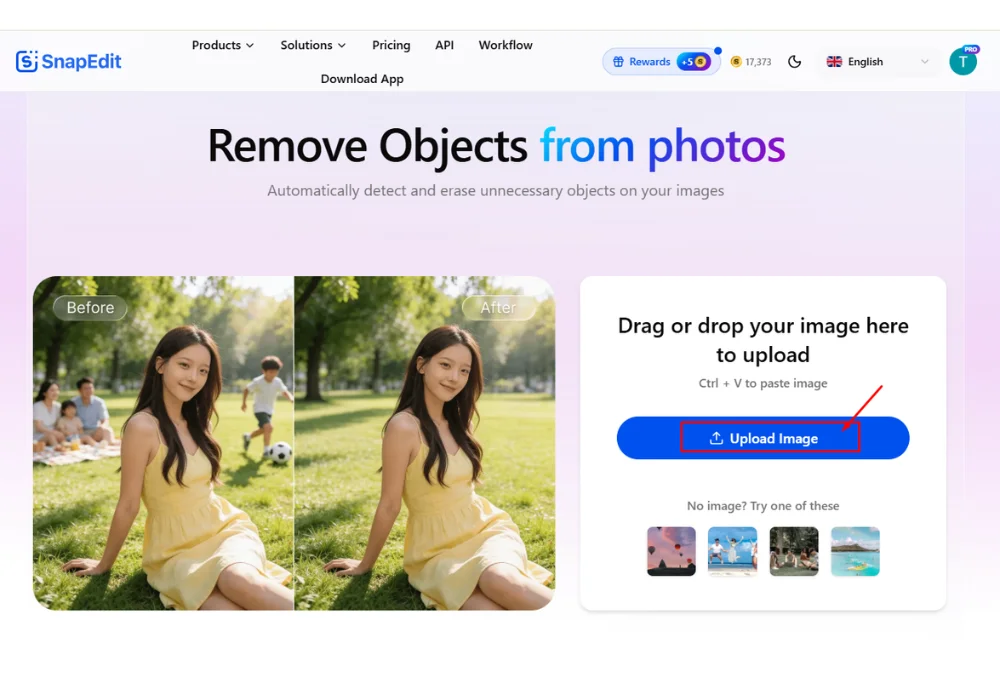
Step 1: Upload Your Photo
Open the SnapEdit remove object tool on web, or open the SnapEdit app on iOS or Android. Tap Upload Image, or drag and drop the photo directly into the editor.
The editor works with JPEG and PNG files. Higher-resolution originals give the AI more detail to work with, so avoid uploading a photo that has already been heavily compressed.
Step 2: Let AI Detect Objects and People
Once the photo loads, SnapEdit's Auto Detect AI scans the entire image and outlines every object and person it finds. A photo with a crowd in the background, for example, can return dozens of detected objects at once, each with its own confidence score.
Auto Detect draws tighter, more accurate outlines than manually tracing an object by hand, especially around hair, fingers, and other edges that are easy to miss with a brush. Each detected item shows a label (Person, Backpack, and so on) along with how confident the AI is, typically in the high 90s percent for common objects.
Turning Auto Detect off switches the editor into fully manual mode, covered in the Manual Mode section below.
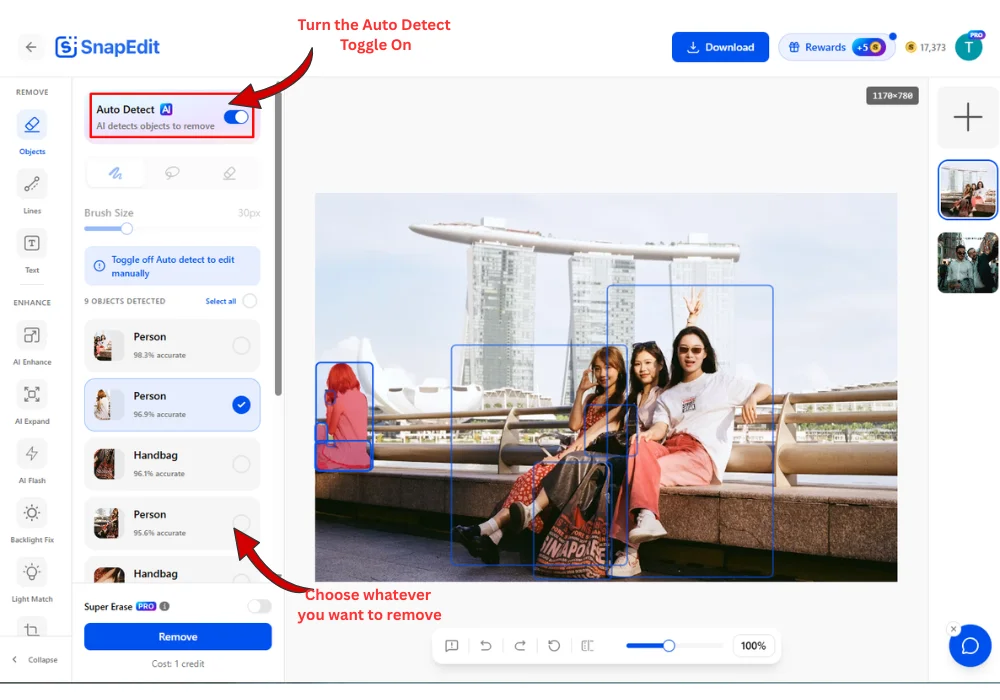
Step 3: Choose What to Remove
Every detected object appears as a toggle in the sidebar. Tap to select the people or objects that should be erased, and leave the rest unchecked. A Select All option is available when the whole list needs to go, useful for photos with many small background distractions like litter or signage.
This selective step matters most in group photos. Instead of erasing everyone and starting over, SnapEdit lets you keep the two people who matter and remove the strangers walking through the background.
Step 4: Pick a Removal Model and Erase
SnapEdit runs on three different AI removal models, and the right one depends on the size and complexity of what's being removed.
Remove Object Normal handles small to medium objects on simple backgrounds. It is the fastest of the three and works well for background clutter, minor blemishes, or small stray objects.
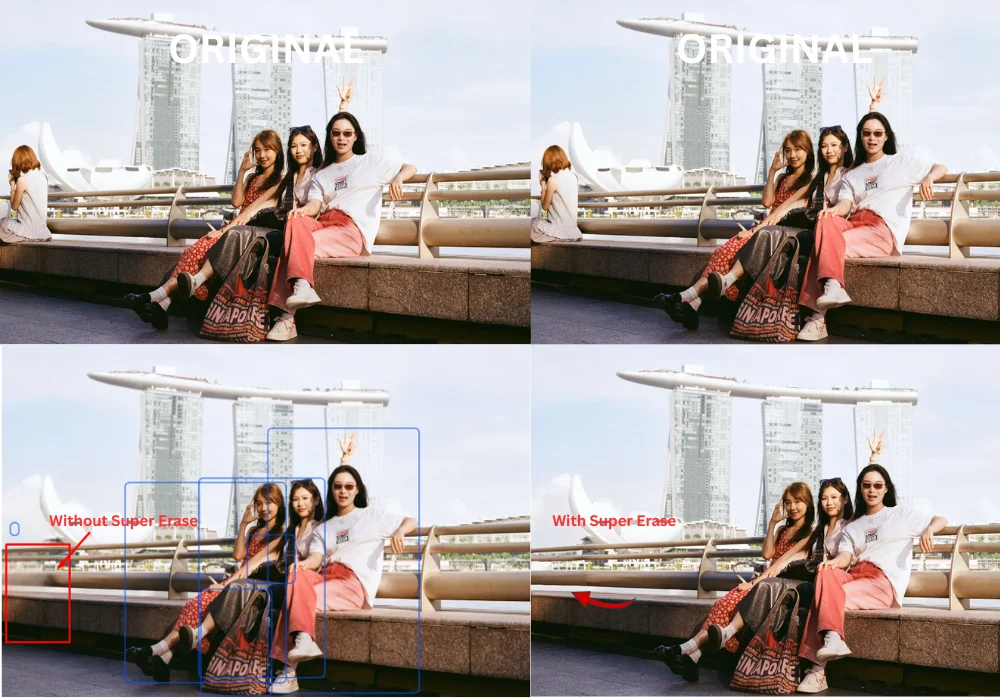
Remove Object Super, called Super Erase in the SnapEdit web and mobile apps, uses a diffusion-based model to reconstruct larger or more complex areas, like a person standing in front of a patterned wall or a reflection. It rebuilds fine detail such as fabric texture and lighting instead of just blending nearby pixels.
Remove Object Ultra is SnapEdit's strongest model, built for large foreground objects, architecture, and scenes where perspective and shadow need to stay physically consistent. This is the model to reach for on a photo where a big object sits in front of important detail, like a person blocking a storefront sign. However, due to the high cost, this model is only available to API users.
For most everyday photos, the default model SnapEdit selects works fine. Switching to Super is worth it specifically when the removed area is large or the background behind it is visually complex.
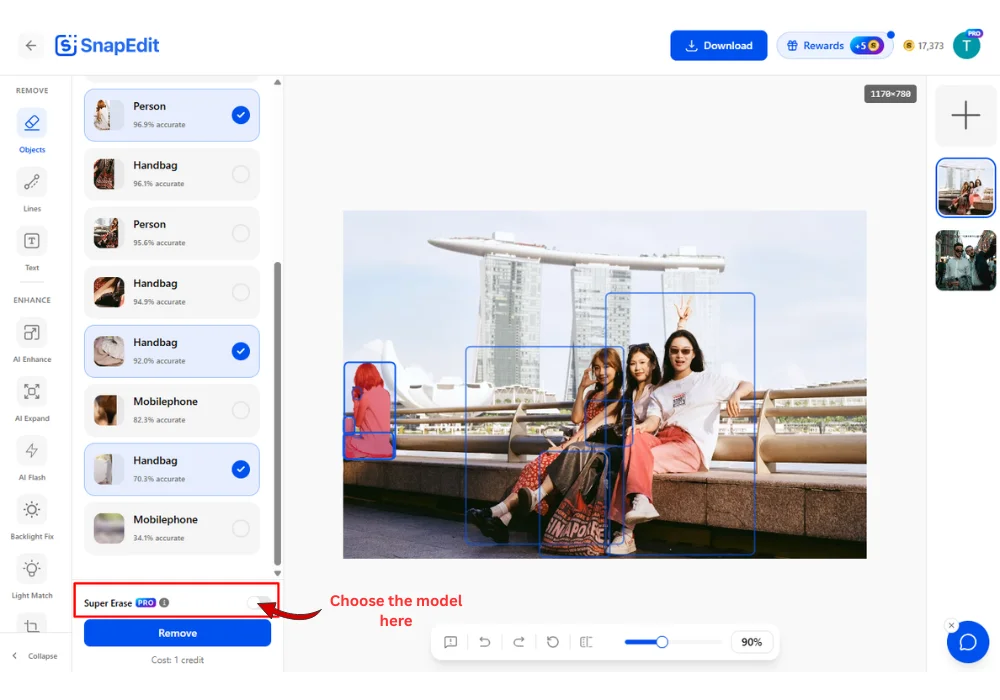
Tap Erase once the objects are selected and the model is chosen. Processing usually finishes in a few seconds.
Manual Mode: Brush Away Objects AI Missed
Auto Detect handles most common objects well, but some things are harder for AI to isolate cleanly: fine wires, small blemishes on skin, faint watermarks, or objects tucked behind other elements in the frame.
Switching to Brush mode lets you paint directly over the area to remove, with an adjustable brush size for precision. Toggle off Auto Detect first, then use the brush to mark exactly what should disappear. This works alongside AI detection rather than replacing it, so a photo can use Auto Detect for the obvious objects and a manual brush stroke for the details it missed.
Removing People from Group Photos
Group photos are one of the most common reasons people reach for an object remover. A stranger walks into frame during a wedding photo, or a crowd fills the background of an otherwise good travel shot.
The same four-step workflow applies. Auto Detect will typically catch every person in the frame individually, including ones partially hidden behind others. Select only the people who need to go, keep the rest, and choose Remove Object Super or Ultra if the people being removed are large in the frame or standing in front of a detailed background.
Object Removal on Web, iOS, and Android
The core workflow is the same everywhere: upload, detect, select, erase. The web version works directly in a browser with no install needed. The iOS and Android apps run the same AI models with a mobile-first layout, useful for editing a photo right after taking it, straight from the camera roll.
Removing Objects in the SnapEdit App (Step by Step)
The steps above describe the web editor. Inside the mobile app, the flow looks slightly different:
- Open the SnapEdit app and tap Objects from the home screen to launch the remove object tool.
- Tap Add Photo, then choose the image from your camera roll or take a new photo directly.
- SnapEdit's AI automatically analyzes the photo and outlines every object and person it detects, the same Auto Detect behavior as on web.
- Tap each item to select or deselect it, or use Select All if the whole list needs to go.
- Tap Erase to remove the selected items. Processing usually finishes in a few seconds.
- Once the result looks right, tap Save to store the edited photo directly to your device.
If a small detail gets missed, such as a stray wire or a blemish AI didn't catch, toggle off Auto Detect and switch to the brush tool to mark it manually, same as on web.
Don't have the app yet? Get it from the App Store or Google Play. No account or credit card is required to install it or make a first edit.
Tips for Clean Results
A few habits make a real difference in how natural the final photo looks.
Zoom in after erasing. Check the edges where the object used to be, especially against patterned backgrounds like brick, foliage, or fabric. A quick brush touch-up fixes most leftover artifacts.
Brush slightly past the object's edge. Include the object's shadow or reflection in your selection. A selection that stops exactly at the outline can leave a faint trace behind.
Start with the highest-resolution photo available. Inpainting quality depends on how much real detail the AI has to reconstruct from, and a low-resolution source gives it less to work with.
For Developers: Remove Object API
The same three models are available through the SnapEdit API, so teams building their own photo editing features can call them directly instead of building object removal from scratch.
| Model | Best For | Speed | Price per Image | Per 1,000 Images |
|---|---|---|---|---|
| Remove Object Normal | Small to medium objects, simple backgrounds, batch processing | Fast | $0.004 (2 credits) | $4 |
| Remove Object Super | Larger objects, complex textures, high realism needs | Moderate | $0.006 (3 credits) | $6 |
| Remove Object Ultra | Large foreground objects, architecture, premium retouching | Slower, highest quality | $0.034 (17 credits) | $34 |
All three share the same endpoint, /v1/images/remove-objects, and take an RGB image plus an RGBA mask as input. The erase_mode parameter selects the model, so an application can route a request to the appropriate one based on object size or a quality setting the user picks.
New accounts get free credits with an API key, and no credit card is required to start.
Frequently Asked Questions
Is SnapEdit's object remover free?
Yes, the core remove object tool is free to use on web, iOS, and Android. A premium tier unlocks additional features, and the developer API is priced per image for teams building their own products.
Does SnapEdit keep my uploaded photos?
SnapEdit does not retain your original or edited photos after processing. Check the current privacy policy on SnapEdit's site for full details.
Can SnapEdit remove multiple people at once?
Yes. Auto Detect finds every person in the frame individually, and each one can be selected or left alone before erasing, so a group photo can have several people removed in a single pass.
What is the difference between Auto Detect and Brush mode?
Auto Detect uses AI to find and outline objects automatically, which is faster and usually more accurate on clear subjects. Brush mode is manual, useful for small details like wires, blemishes, or partially hidden objects that AI detection can miss.
Try It Yourself
Removing an unwanted object or a stranger from a photo no longer takes a photo editing background or expensive software. Open the SnapEdit remove object tool, upload a photo, and see the result in seconds.
If the photo also needs background cleanup, SnapEdit's background remover pairs naturally with object removal for a fully polished shot.